My daughter is getting married in 40 days! We’ve been experimenting with cake flavors and frostings. I decided to do this one last night, which is small (6 inches wide x 3 inches high). This would work well as a cake top for someone who eats gluten free but is serving their guests a different kind of cake or for the top of a cupcake cake. But it is very delicious and also thicker than a regular cake mix cake, so it would work well for lower layers as well. Trust me, it’s so good no one would know it’s gluten free!
I’m a big fan of Betty Crocker gluten free cake mixes. I used a white cake mix. Instead of using butter or oil, I used a 6 ounce vanilla yogurt and instead of water I used 2/3 cup orange juice. I added three eggs but didn’t use vanilla. This same thing would make wonderful lemon or lime cake, using lemonade or limeade, or adding real lemon or lime to water, along with the zest. If you’re considering putting in a flavored Jell-O, don’t! The crystals don’t dissolve. If you’re a chocolate fan, the Betty Crocker GF chocolate cake is amazing! I’d still substitute yogurt for the butter/oil.
When I bake round cakes or cakes for decorating I cut the pan shape out of waxed paper,by drawing around the pan bottom with a pen on waxed paper and cutting it out. I grease the pan and put in the wax paper. For this cake I also greased the sides, and then placed waxed paper about 5 inches tall around the sides. Since a Betty Crocker mix makes one layer of a round or square cake, I wanted to use the whole thing to make my 6 inch cake taller. If you are patient (and not daring and a bit crazy like me) you can do this by baking half the batter in the pan and then repeating. I went ahead and put the whole thing in. The waxed paper held it in well, but to make sure it doesn’t overflow you should put foil or a pan on the wrack underneath where you are baking. I baked mine on 350 degrees for 30 minutes, checked it, and then added 10 more, etc. Mine took about an hour to be fully baked. Of course the top will be crooked, but with any cake you decorate you’ll be cutting the top off to make it flat, so don’t worry.

Let your cake cool on a wire rack for several minutes in the pan, then remove upside down in your hand and gently pull the waxed paper off the bottom and sides. Set the cake back on the rack to cool completely. Before freezing, use a serrated knife to cut the crooked or round top off so that it’s flat. If you’re worried you can measure the shortest side and make marks to be sure you cut it straight. I wrap my cake in plastic wrap and freeze overnight.

My next step was to make some marshmallow fondant. I have NEVER decorated cakes in any form professionally, or have learned at all. I have done the cute, creative cakes for kids birthdays, but never knew the tricks of professional cake decorators. So this wedding cake stuff took some research. I saw a few things on Pinterest, but the most useful thing was watching videos on youtube.com. Several people told me fondant is icky and to use butter cream frosting instead, but I’ve seen good things about both. I used techniques for both on this cake. I used half of this recipe for marshmallow fondant, which I found easier to make than it looked. It was actually pretty quick and fun. I stored it in plastic and a plastic bag overnight to cure.
For a cake plate I traced a dinner plate onto cardboard and then cut it out with a razor knife. To look thicker than one layer I added some butter cream frosting to the back of the dinner plate then put the cardboard circle on top to hold in place.
When reading cake decorating directions I had NO IDEA what a crumb layer was! Wow, I was amazed when I learned that it’s actually just putting a thin layer of butter cream on your frozen cake, catching the crumbs that ALWAYS come off when spreading! If only I’d known this trick when decorating my many kids’ birthday cakes and having to put more frosting over to try to hide the crumbs! So I made my own version of butter cream frosting, which I should maybe call “Shortening Cream Frosting,” but I won’t. The other reason for this is you can buy white butter at a health food store (or so I’ve heard) so that you’re your frosting is white. Since I try to stay away from casein as much as possible, I did use shortening, as well as casein free milk. You can use milk, heavy cream, or use soy, rice or almond milk. For this small cake this is my recipe:
1 cup shortening
½ teaspoon salt
½ teaspoon clear vanilla or other flavoring
3 – 4 cups powdered sugar (confectioner’s sugar)
2 – 3 tablespoons milk
I began with three cups powdered sugar and added more after mixing. I used 2 tablespoons milk and made the frosting thick for my crumb layer. When that was finished I put the cake back into the freezer. When it was firm I added another tablespoon of milk to the frosting and beat it again. (I put some butter cream frosting on the cardboard to keep my cake from sliding around.)

This is where the cool Viva paper towel trick comes in. HOW TO FROST A CAKE WITH A PAPER TOWEL

It really works if you don’t want to use fondant and you have lots of time to be extra perfect! It was fun, but I didn’t do mine to perfection since I wanted to cover it with fondant. My cake looked sort of okay at this point.

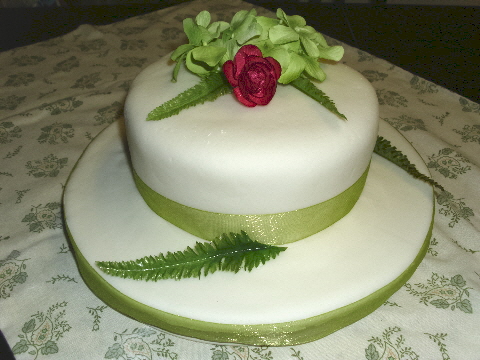
Next I covered my surface with sprinkled powdered sugar (you can also use corn starch) beneath the fondant. With a rolling pin I rolled it thin and into a circle, probably ¼ inch thick and so it would at least cover the twelve inches (sides and top) of the cake. If you watch the video you see how easy it is to roll halfway onto your rolling pin to help lift and place onto your cake. The rest of it was so easy! But I’d watched these pros on the videos, so I knew how to smooth and remove the bubbles and then trim. As for covering the cardboard circle, I saw this trick in the video too. I kneaded the remaining fondant and then rolled it out into a long strip. I used a yardstick to push the one edge straight, but you can cut it with a knife. I placed this around the cardboard, surrounding the cake.
I used ribbon at the bottom of the cake layer, cutting and securing in place with butter cream frosting. Then I added another row around the bottom of the cake. I used bits of silk flowers and leaves to decorate the top and sides, also securing them with a dab of butter cream frosting.
When my daughter got home from work she just couldn’t believe I’d done it! She was relieved and said, “So, will you make my wedding cake?” Cute, huh? Well, I’ll be here to help her! At least now I know we can do it!
Here are two videos I love for help decorating wedding cakes:


Recent Comments